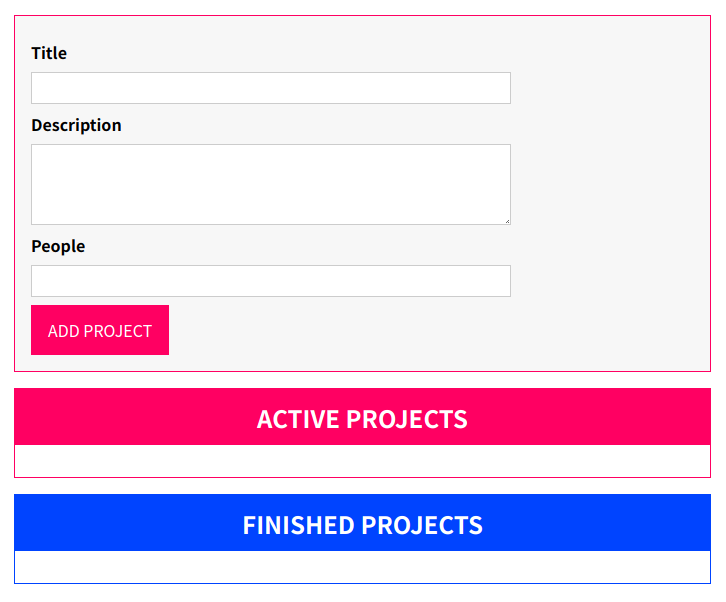
렌더링 프로젝트 목록
class ProjectList {
  templateElement: HTMLTemplateElement;
  hostElement: HTMLDivElement;
  element: HTMLElement; // 1

  //                                 2
  constructor(private type: 'active' | 'finished') {
    this.templateElement = document.getElementById(
      "project-list"
    )! as HTMLTemplateElement;
    this.hostElement = document.getElementById("app")! as HTMLDivElement;

    const importedNode = document.importNode(
      this.templateElement.content,
      true
    );
    this.element = importedNode.firstElementChild as HTMLElement;
    this.element.id = `${this.type}-projects`; // 3
    this.attach();
    this.renderContent();
  }

  private renderContent() {
    const listId = `${this.type}-projects-list`; // 3
    this.element.querySelector('ul')!.id = listId;
    this.element.querySelector('h2')!.textContent = this.type.toUpperCase() + ' PROJECTS';
  }

  private attach() {
    this.hostElement.insertAdjacentElement("beforeend", this.element); // 4
  }
}

...

const prjInput = new ProjectInput();
const activePrjList = new ProjectList('active');
const finishedPrjList = new ProjectList('finished');
프로젝트 리스트 목록을 렌더링 할 새로운 클래스를 작성합니다.
전 블로그에서 했던 Input 클래스 렌더링과 크게 다르지 않습니다.
- section 태그이지만 특화된 유형이 없기에 일반적인 HTMLElement로 설정해 줍니다.
- 매개변수로 유니언 타입을 받아 활성화된 리스트와 종료된 리스트를 보여줄 것입니다.
- 템플릿 리터럴을 이용해 id를 부여합니다.
- 이번엔 종료 태그 앞에 생성해 보겠습니다.
싱글톤으로 애플리케이션 상태 관리하기
class ProjectState {
  private listeners: any[] = [];
  private projects: any[] = [];
  private static instance: ProjectState;

  private constructor() {

  }

  // 3
  static getInstance() {
    if (this.instance) {
      return this.instance;
    }
    this.instance = new ProjectState();
    return this.instance;
  }

  // 5
  addListener(listenerFn: Function) {
    this.listeners.push(listenerFn);
  }

  // 1
  addProject(title: string, description: string, numOfPeople: number) {
    const newProject = {
      id: Math.random().toString(),
      title: title,
      description: description,
      people: numOfPeople
    }
    this.projects.push(newProject)
    // 5
    for (const listenerFn of this.listeners) {
      listenerFn(this.projects.slice())
    }
  }
}

// 2
const projectState = ProjectState.getInstance();

...

class ProjectList {
  templateElement: HTMLTemplateElement;
  hostElement: HTMLDivElement;
  element: HTMLElement;
  assignedProjects: any[];

  constructor(private type: "active" | "finished") {
    this.templateElement = document.getElementById(
      "project-list"
    )! as HTMLTemplateElement;
    this.hostElement = document.getElementById("app")! as HTMLDivElement;
    this.assignedProjects = []; // 6

    const importedNode = document.importNode(
      this.templateElement.content,
      true
    );
    this.element = importedNode.firstElementChild as HTMLElement;
    this.element.id = `${this.type}-projects`;

      // 6
      projectState.addListener((projects: any[]) => {
        this.assignedProjects = projects;
        this.renderProjects(); // 7
      });

    this.attach();
    this.renderContent();
  }

  // 7
  private renderProjects() {
    const listEl = document.getElementById(`${this.type}-projects-list`)! as HTMLUListElement;
    for (const prjItem of this.assignedProjects) {
      const listItem = document.createElement('li');
      listItem.textContent = prjItem.title;
      listEl.appendChild(listItem);
    }
  }

  ...

}

class ProjectInput {

  ...

  @autobind
  private submitHandler(event: Event) {
    event.preventDefault();
    const userInput = this.gatherUserInput();
    if (Array.isArray(userInput)) {
      const [title, desc, people] = userInput;
      projectState.addProject(title, desc, people); // 4
      this.clearInputs();
    }
  }

  ...

}
리액트 리덕스와 비슷한 패턴을 위한 앱 상태를 관리하는 클래스를 구축합니다.
- 버튼 입력 시 그 내용을 리스트에 추가합니다.
- 전역 상수가 되어 파일 어디에서나 사용될 수 있게 합니다.
- 항상 전체 앱에서 한 가지 유형의 객체(하나의 상태 관리)를 갖게 합니다.
- Input 클래스와 연결합니다.
- 상태가 변경될 때마다 함수 목록을 호출하고 복사본을 얻습니다.
- 리스트에 연결해 갱신된 리스트를 받아옵니다.
- 받아 온 리스트를 렌더링 합니다.
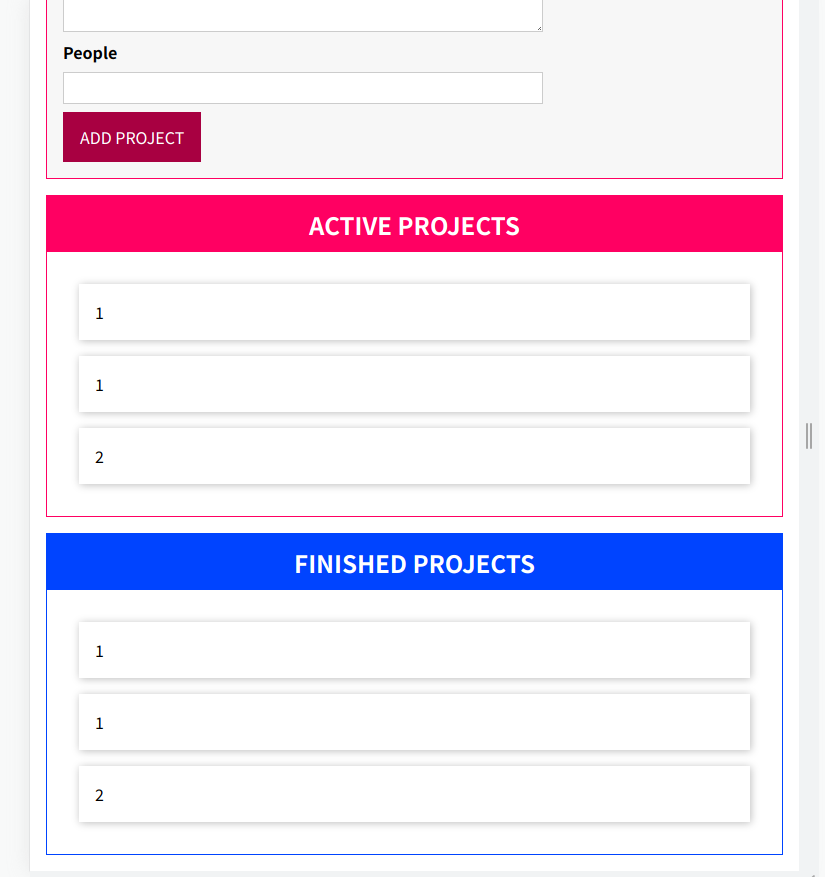
지금까지의 과정으로 입력이 화면에 보이게 됩니다.
하지만 분류되지 않았고 전의 입력한 데이터가 중첩됩니다.
이제 이 문제들을 해결해야 합니다.
더 많은 클래스 및 사용자 정의 타입
enum ProjectStatus {
  Active,
  Finished,
}

class Project {
  constructor(
    public id: string,
    public title: string,
    public description: string,
    public people: number,
    public status: ProjectStatus
  ) {}
}

class ProjectState {
  ...
  private projects: Project[] = [];
  ...
  addProject(title: string, description: string, numOfPeople: number) {
    const newProject = new Project(Math.random().toString(), title, description, numOfPeople, ProjectStatus.Active); //
    this.projects.push(newProject);
    for (const listenerFn of this.listeners) {
      listenerFn(this.projects.slice());
    }
  }
}
다음과 같이 Project 클래스를 정의하여 코드를 개선하였습니다.
type Listener = (items: Project[]) => void;

class ProjectState = {
  private listeners: Listener[] = [];
  ...
  addListener(listenerFn: Listener) {
    this.listeners.push(listenerFn);
  }
  ...
}

...

class ProjectList = {
  ...
  constructor(private type: "active" | "finished") {
	...
    projectState.addListener((projects: Project[]) => {
      this.assignedProjects = projects;
      this.renderProjects();
    });
	...
  }
  ...
}
Listener 타입을 정의하여 코드를 개선하였습니다.
열거형으로 프로젝트 필터링하기
class ProjectList {
  templateElement: HTMLTemplateElement;
  hostElement: HTMLDivElement;
  element: HTMLElement;
  assignedProjects: Project[];

  constructor(private type: "active" | "finished") {
    this.templateElement = document.getElementById(
      "project-list"
    )! as HTMLTemplateElement;
    this.hostElement = document.getElementById("app")! as HTMLDivElement;
    this.assignedProjects = [];

    const importedNode = document.importNode(
      this.templateElement.content,
      true
    );
    this.element = importedNode.firstElementChild as HTMLElement;
    this.element.id = `${this.type}-projects`;

    // 1
    projectState.addListener((projects: Project[]) => {
      const relevantProjects = projects.filter(prj => {
        if(this.type === 'active') {
          return prj.status === ProjectStatus.Active;
        }
        return prj.status === ProjectStatus.Finished;
      })
      this.assignedProjects = relevantProjects;
      this.renderProjects();
    });

    this.attach();
    this.renderContent();
  }

  private renderProjects() {
    const listEl = document.getElementById(
      `${this.type}-projects-list`
    )! as HTMLUListElement;
    listEl.innerHTML = ''; // 2
    for (const prjItem of this.assignedProjects) {
      const listItem = document.createElement("li");
      listItem.textContent = prjItem.title;
      listEl.appendChild(listItem);
    }
  }

  private renderContent() {
    const listId = `${this.type}-projects-list`;
    this.element.querySelector("ul")!.id = listId;
    this.element.querySelector("h2")!.textContent =
      this.type.toUpperCase() + " PROJECTS";
  }

  private attach() {
    this.hostElement.insertAdjacentElement("beforeend", this.element);
  }
}
- 필터링을 통해 리스트를 분류합니다.
- 초기화를 통해 전에 남아있던 리스트를 없애 중복을 방지합니다.


